Einstein Prediction Builder : View your Predictions

After building a quality prediction, it has to be made available to different users of Salesforce to help improve their process and gain efficiencies.

In case you want to get more details on how to improve predictions, please refer to my previous blog – Einstein Prediction Builder : Improving Predictions by improving data quality

One of the ways to see the prediction is through Salesforce Listview as the field is available.

(In our use case, the prediction is not there for escalated cases as we are finding the probability of escalation).

On the Lightning Experience record page, Salesforce has provided a component called “Einstein Predictions” which shows Prediction details. Following steps need to be carried out for adding and configuring the component.

1. Edit the Lightning Page for the Record.

2. Drag the Einstein Predictions lightning component on the page.

3. In the component configuration panel, go to the “Prediction” lookup and search for the Prediction that we built. In our case we built the prediction called “Case_Escalation_Probability”.
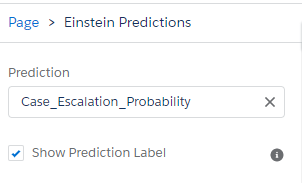
There are other parameters as well which are as follows :-

SETTINGDESCRIPTION
PredictionSearch for a list of any predictions (deployed models) to which you have access.
Show Prediction LabelSelect this check box to show the prediction label.
TitleDescriptive label for the prediction.
Show titleSelect this checkbox to show the title.
Prediction score unitUnit of measure for the prediction. Eg : Currency for money-based predictions.
Unit precedes scoreSelect this checkbox to show units preceding the prediction, such as currency symbols. By default, units follow the prediction.
Positive prediction labelLabel to display when the prediction is higher than the threshold in a binary classification model.
Negative prediction labelLabel to display when the prediction is lower than the threshold in a binary classification model.
Show top predictorsSelect this checkbox to show the predictors with the highest impact on the prediction.
Collapse detailsSelect this checkbox to show top predictors but hide other details.
Include link to model cardSelect this checkbox to show the Learn about this model link that users can click to see the model card associated with this prediction.
Show improvementsSelect this checkbox to show Einstein Discovery suggestions on how to improve the predicted outcome.
Number of improvements to showSet the maximum number of improvements returned on the prediction card.
Improvement threshold percentageSpecify a number to display only improvements that impact the predicted outcome by this percentage or higher.
Show values for predictorsSelect this checkbox to show the impact value next to predictors and improvements.
Show prediction warningsSelect this checkbox to show user warnings.
Calculate prediction as a dateSelect this checkbox to show time-based predictions as based on a relative start date plus an offset value (the original prediction result).
Start calculating date prediction fromSelect the date field to use for when to start calculating the predicted date.
Time periodSelect the unit for the offset value (original prediction result) used to calculate the predicted date.
Predicted date formatSelect how to display the predicted date.
Time Remaining formats the prediction according to the selected Time period.
Specific Date formats the prediction as a date according to the logged-in user’s locale settings.
Show prediction history starting fromSelect a reference point to display score history.
Set Component VisibilityConfigure any component visibility rules, if needed, by defining filter criteria for a device, record field, or other field.
(Table referenced from Salesforce Help Docs. The parameters and labels can change with time).

4. Save the page and now you can see the Einstein Prediction component on the page.
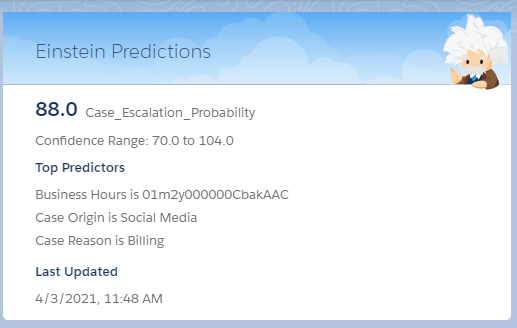
Confidence Range : This range shows the low and high values of what the score is.

Top Predictors : They are fields (and their values) that have major influence the score.
Einstein Prediction Builder : Improving Predictions by improving data quality

In my last blog on Einstein Prediction Builder, we were able to improve our prediction score by choosing the right fields for doing the prediction. Link to last blog – Einstein Prediction Builder : Improving Predictions through choice of fields

In this blog, we will understand why data quality is important for improving prediction results.

Imagine an astrologer predicting your future but doesn’t have your date of birth . Imagine a store predicting the sale in month’s to come, but they count the store and customer’s receipt of bills (i.e. double counting the sale proceeds).

This is a similar situation that we might encounter in our data. We are now going to talk through steps to improve data quality and thus improve our prediction.

Just a quick recap, we achieved a score of 47 in the previous module.

STEP 1 : Remove the Duplicates

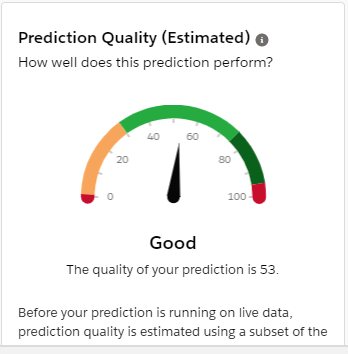
When we prepare the example set, it is important to cleanse the data to remove duplicates. Salesforce Duplicate Rules or products from AppExchange can help in cleaning data and removing the duplicates. Post removing the duplicates, it is important to re-evaluate the score. In our case, the score increased to 53.
STEP 2 : Validate Data in the example set

It is important to ensure that our example set has valid data. Try to give meaning to the data, by ensuring the fields are populated with proper and meaningful values.

Avoid values like etc. , any other reason, none of the above. Such values can result in low scores especially if they appear on large number of records.

Check if the data is correct and fix the data if there is an issue. This however requires involvement from business users to help in fixing the data and converting it into a meaningful information.

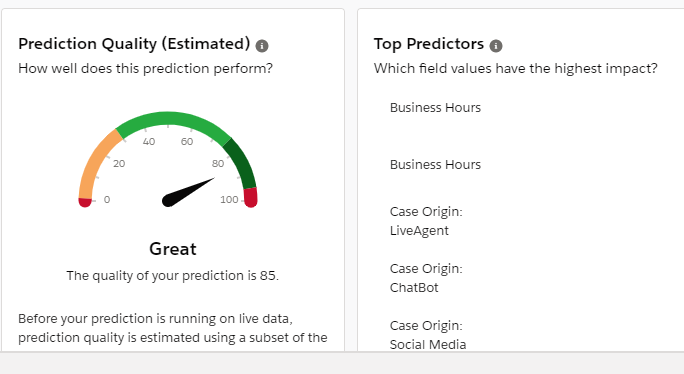
After completing the above, the score of my prediction became 85.

So with some basics checks, we moved our score from Good to Great.

It is important to note that it was not just improving the data quality that moved the score, it was series of steps that helped in reaching this mark. To reiterate it is

  • Removing Hindsight Bias.
  • Removing fields which are majorly blank (and will not have too much data in future).
  • Removing fields which has no impact.
  • Removing the Duplicate data.
  • Validating the data.

We will next talk about the Einstein Prediction Builder Component (provided by Salesforce) in my next blog.

Einstein Prediction Builder : Improving Predictions through choice of fields

In my last blog on Einstein Prediction Builder, we created a new numeric prediction. Link to last blog – Build Numeric Predictions with Einstein Prediction Builder

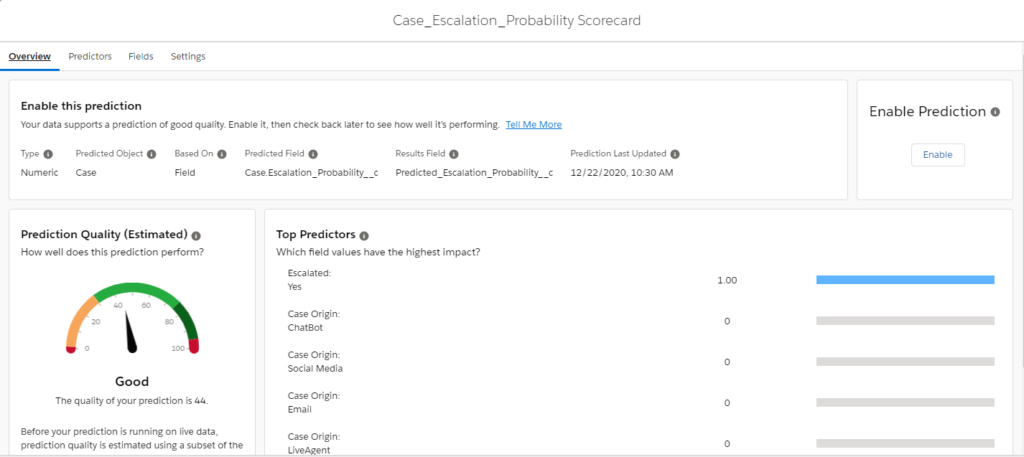
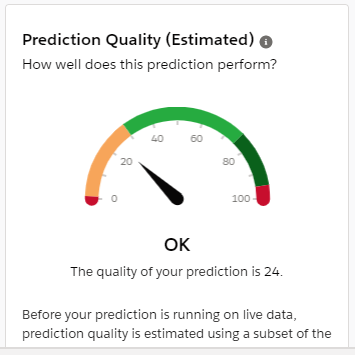
We saw that we got a “Good” prediction score of 44. But is our score good enough to to get quality predictions?

It is really important to understand that even if a score is good, there are chances that our predictions might not predict what we want to see.

To ensure quality, we need to do 2 level of checks :-

  1. The fields we are using.
  2. The data in our example set.

In this Blog, we will cover the improvement we gain from changing the fields.

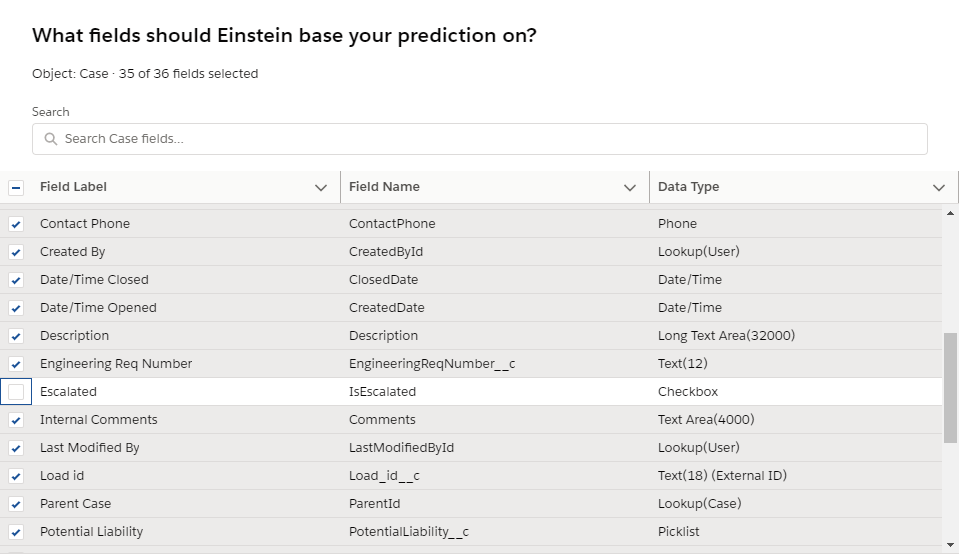
STEP 1 : When we choose the fields, we have to first eliminate “Hindsight Bias“. These are fields where outcome occurs post our use case eg: In our scenario, we are checking the probability of case escalation, but have included “Escalated” field in our prediction set. This means when the field is true, the case is escalated. So if we are predicting chances of escalations, then we can’t have a field in prediction that tells us whether escalation has happened already. Thus it is better to remove this field.

Sometimes it is easy to locate as such fields as they are having High Impact on predictions. Removing such fields can sometimes drop the scores drastically. In my use case, the score dropped to 17.

Now we see Case Origin field having an impact and “LiveAgent” having most impact. However a quick check suggests that this field is not falling under the category. Thus we can eliminate the Hindsight Bias towards the prediction by carefully checking the report and fields being used.

Having got a low score at the moment, shouldn’t be a concern as we have taken a step towards quality prediction.

STEP 2 : We should now review the fields where we have no / minimal data in example set. These fields can’t help much in quality predictions and should be removed from the field set. In my use case, I chose to eliminate the fields with no / minimal data.

Checking the score with the change resulted in increase of score to 24.

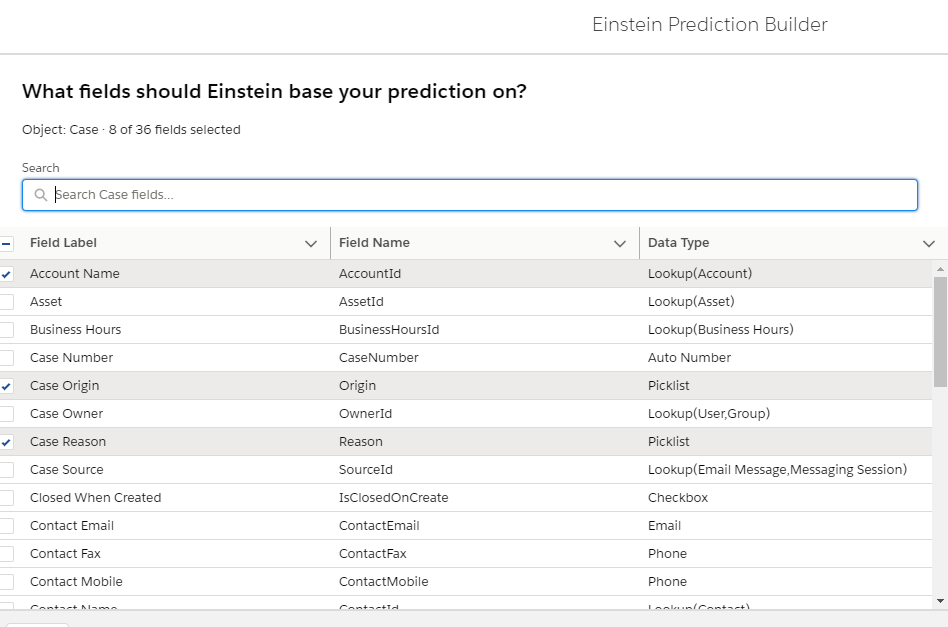
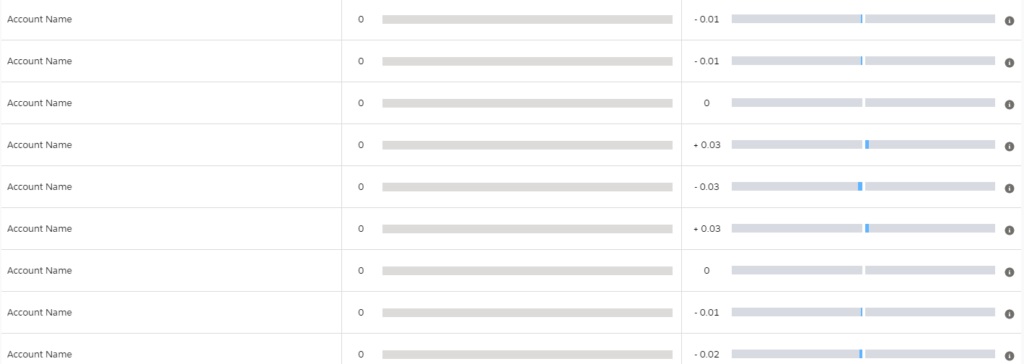
STEP 3 : Remove the fields which have low impact / variance. This can be found when we open the Top Predictors report (link on Scorecard).

As we can see Account Name has no impact so removing the field can help in improving our results.

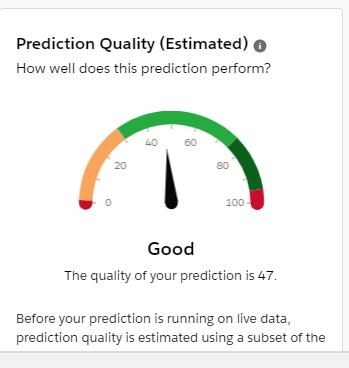
We have now reached the Good range again with a score of 47.

So we started with a score of 44 with low quality of predictions and ended with 47 but having a higher quality of prediction. The improvement we did is a step in the right direction to get quality predictions and would further help the score from Good to Great (which I will cover in the next blog).

Build Numeric Predictions with Einstein Prediction Builder

In my last blog Build Predictions with Einstein Prediction Builder, I talked about building predictions for a Yes / No response. We will now Build an Einstein Prediction with Numeric outcome and going through some other options available.

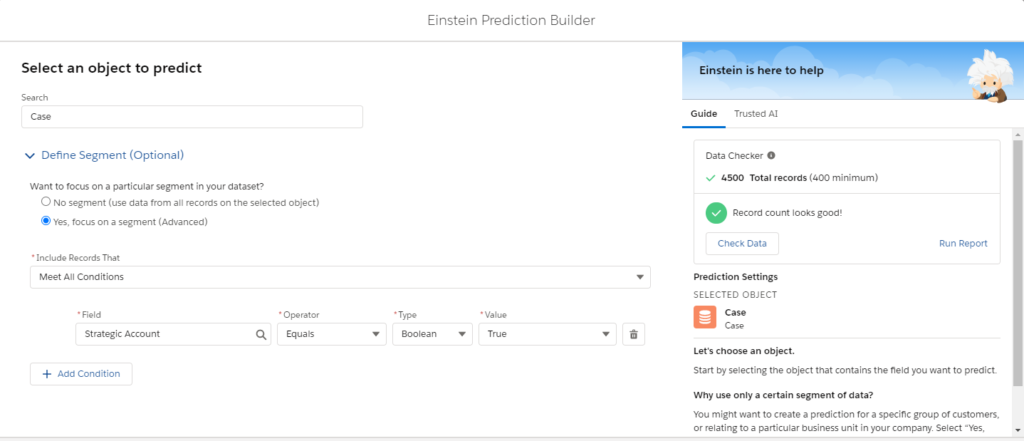
In this prediction, we will only focus on Strategic Accounts in my org and build prediction for those accounts only.

1. Click on the New Prediction Button on the Einstein Prediction Builder.

2. Give your Prediction a name (and api). I kept the name as Case Escalation Probability

3. We will now define a “Segment. Segment tells Einstein which records we need to consider as the source of truth and which ones need the prediction to run. eg: If we are pizza delivery company and we want to know the probability of a pizza getting delayed when getting home delivered, then we don’t want the prediction to run for customers with Take Away orders.

4. In our use case, we created a formula field on Case for Strategic Accounts and thus chose “Yes, focus on a segment” in “Define Segment” section.

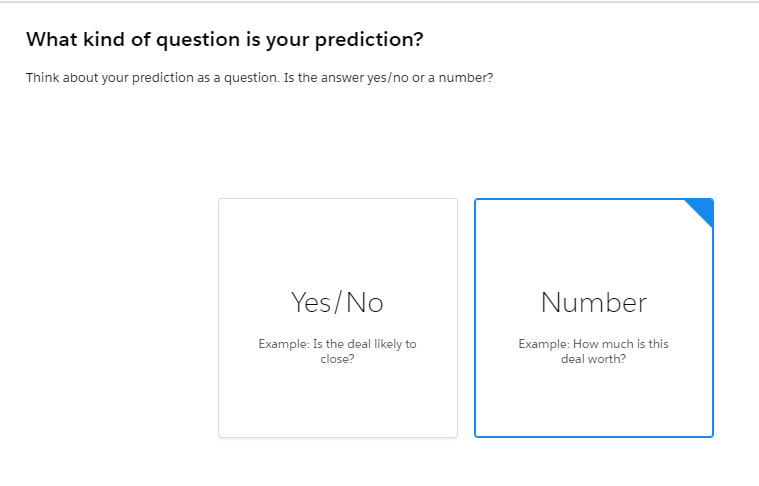
5. We now need to tell whether this would be a “Yes/No” answer or we expect a “Number” value. Since we are working on a probability, we would select a Number field.

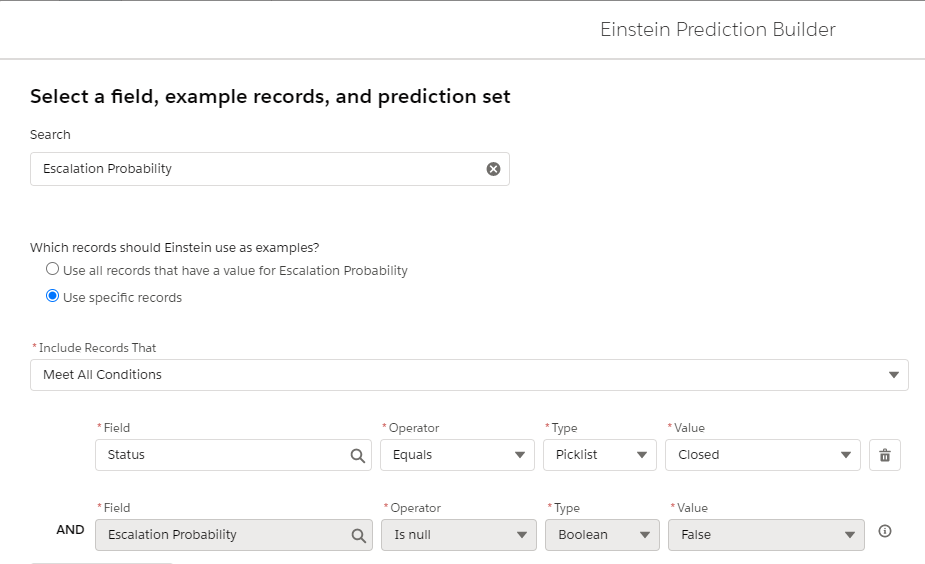
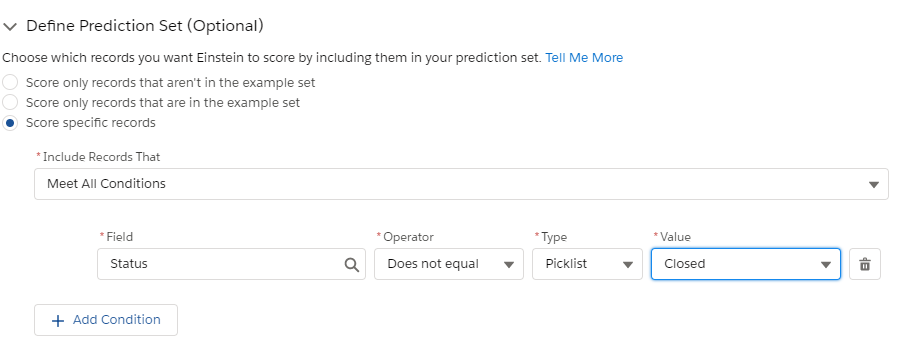
6. In the next screen, we are presented with the option to choose “Example Set” and a “Prediction Set“.

Example Set are set of records which act as source of data. They are the ones who already have relevant values in them, based on which the predictions should be done. In our example, it would be cases (of Strategic Accounts) which are closed as they provide a definitive probability of escalation.

Prediction Set are set of records where we want to run the prediction. In our example, our prediction is to run for cases which are open (of Strategic Accounts). For our use case, we could have also used the option to Score only records that aren’t in the example set.

Please Note Strategic Accounts are based on Data Segmentation done in Step 4.

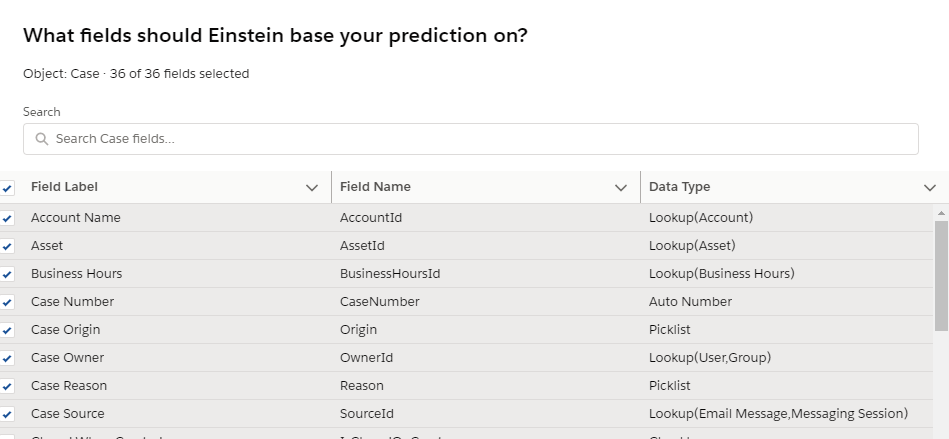
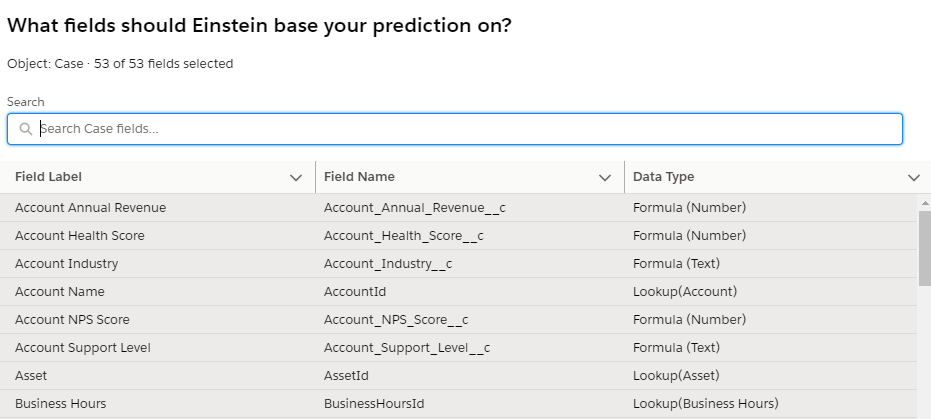
7. Select all the fields for this use case. In my next blog we will reduce the number of fields selected to see the difference in the quality of predictions.

8. We now give the name of the field where we want to save the predictions.

9. Once we have gone through all the Einstein Prediction Builder Screens, we have to wait for predictions to be built. Einstein can take some time to process the data and build the predictions.

10. Once the Status changes for “Ready for Review“, it is suggested to “View Scorecard” before Enabling.

11. Scorecard gives the score of prediction and the factors influencing it. As we can see, in our example IsEscalated field has a major influence on the prediction.

Prediction Quality is Good (in my upcoming blogs, we will work on improving the prediction quality).

12. Now if we add the field on Case List View, we can see the result. As you can see Predictions only appear for Strategic Accounts (as per segmentation)

So we have seen how Einstein Prediction Builder works and the impact of settings. In my upcoming blogs we will deep dive into ways of improving the predictions.

Build Predictions with Einstein Prediction Builder

Now is the time to build the prediction using Einstein Prediction Builder.

In case you want to read about Einstein Prediction Builder, please read my previous blogs in the series

  • Introduction – Part 1
  • How to Enable Einstein Prediction Builder in the org – Part 2

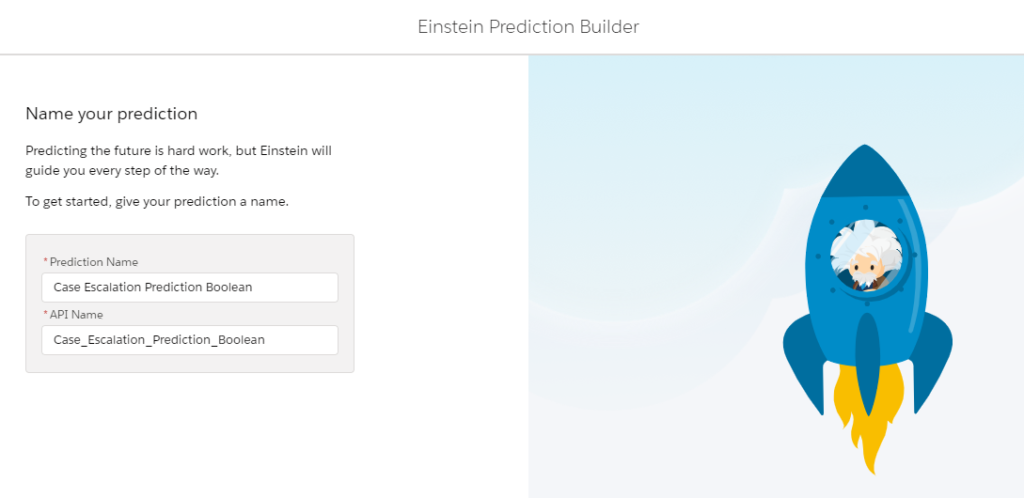
1. Click on the New Prediction Button on the Einstein Prediction Builder.

2. Give your Prediction a name (and api). I kept the name as “Case Escalation Prediction Boolean”

3. Click on “Next” button.

4. Choose the Object. In our example, it would be “Case” object. For now we won’t Segment the data so that we can utilize entire org data.

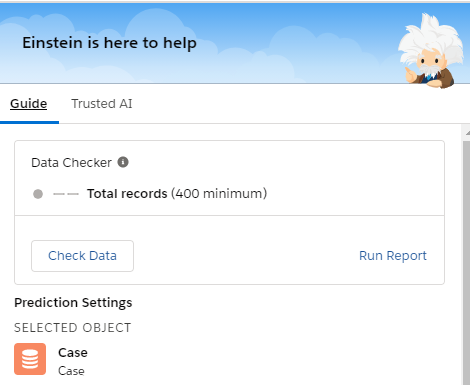
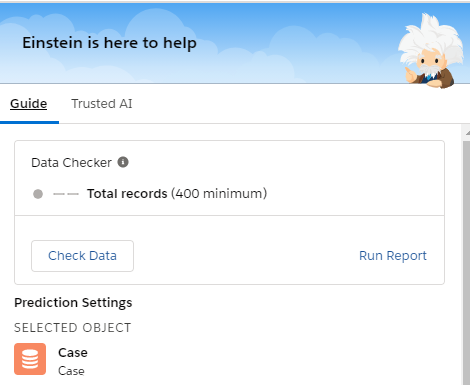
5. Click on “Check Data

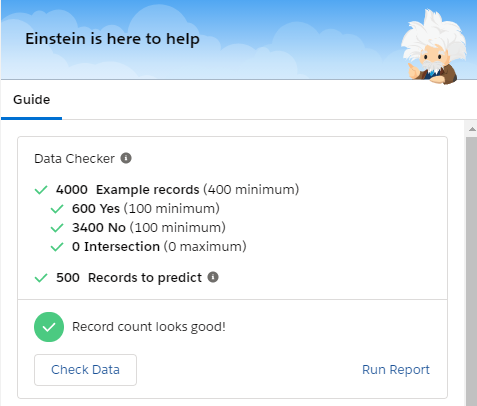
6. This will check the org to see if we have enough data to build the prediction. In our case, we do have enough records.

7. Click Next Button.

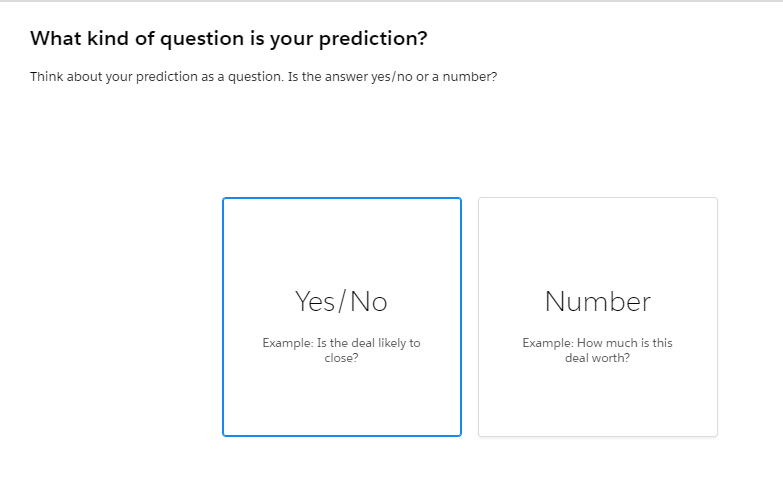
8. We are now presented with an option – whether we want the answer as a simple “Yes / No” or whether we want to see the likelihood of something we are predicting i.e. a “Numeric” value. For our use case, we would go ahead with the “Yes/No” option.

9. Click Next.

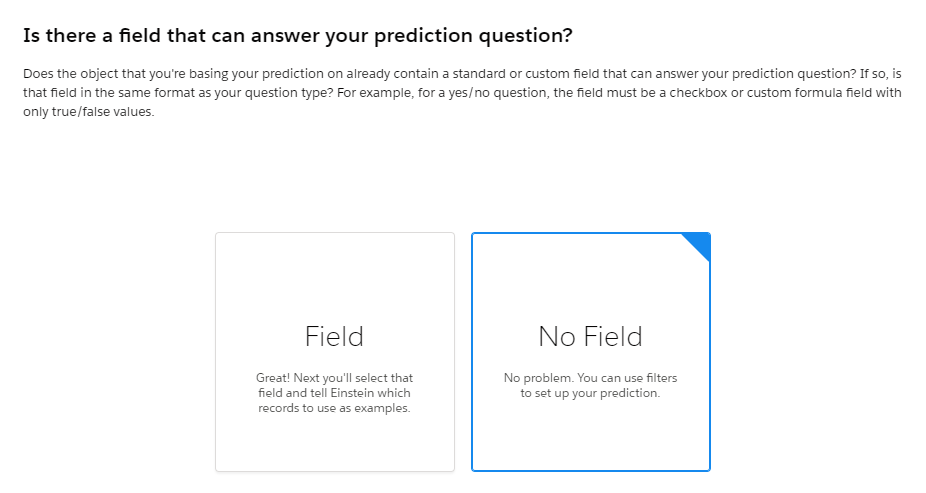
10. In the next screen, there would be an option to save prediction result in an existing field. In Our use case, we could think of using the “Escalated” field – which denotes whether the case is escalated or not. However we want to predict whether it would escalate or not; rather than suggesting whether the case is escalated. So we will go with “No Field” Option.

11. Click Next.

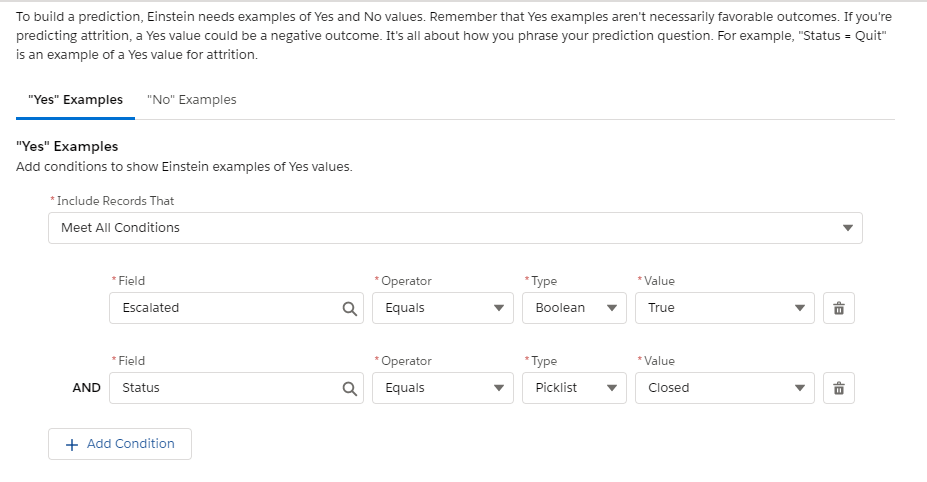
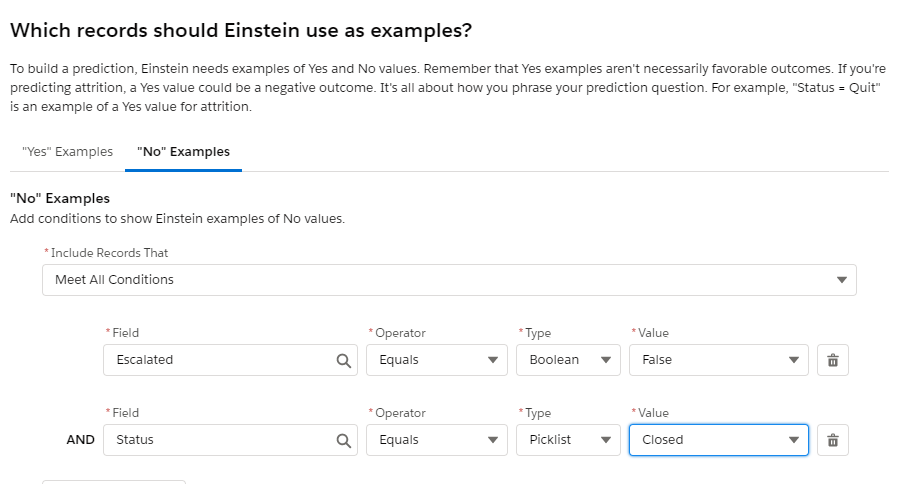
12. We now have to give some examples of Yes and No Scenarios. In this use case, Yes Scenario would be where the case is now closed but was escalated.

13. No Scenario would be where the case is now closed and was not escalated.

14. We now do a quick data check to ensure that we have enough records.

15. Click “Next

16. Einstein Prediction Builder Wizard now asks for the Fields we would like to include for Prediction. You can select all or choose the ones you want to select.

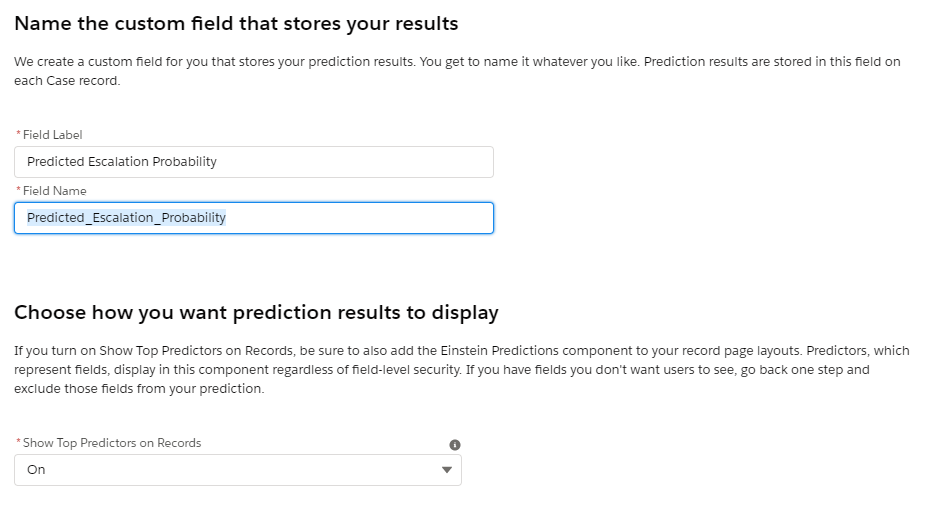
17. We now define the Custom Field where we would like to save the Prediction Result. Lets call this field “Escalation Possibility

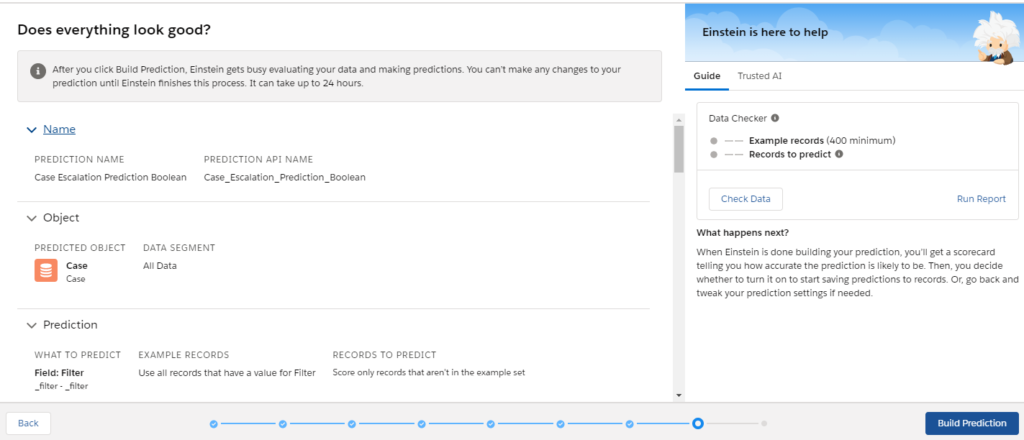
18. Finally we reach the last step and which summarizes our selections.

19. Click on “Build Prediction” and you are all set. It can take some time for Einstein to complete the Prediction.

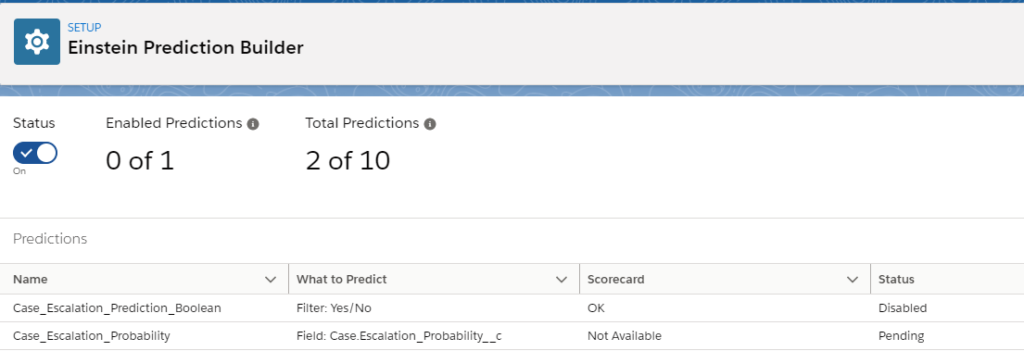
20. Clicking on “Done” will bring you back to the main Einstein Prediction Builder Screen. We will have to wait once Prediction is enabled.

21. Once the Prediction is “Ready for Review“, you can “Enable” the prediction. It is advised to check the scorecard before enabling. We will talk about Scorecard / Optimizing the prediction in further blogs.

22. Once Enabled, the status changes “Enabled” and you can now add the prediction field in Page layouts, Listviews, etc. It can take sometime for the results to appear on the record.

In the upcoming blogs, we will configure a probability (numeric) prediction and walk through on ways to optimize the prediction score.
Getting Started with Einstein Prediction Builder (Part 2)

Continuing on Einstein Prediction Builder, lets enable it in our org.

In case you want to read an introduction to Einstein Prediction Builder or want to get details on how to get it in your org, please read my previous blog called “Getting Started with Einstein Prediction Builder (Part 1)”.

Use Case : I would like to understand the likelihood of an open case to escalate

For every industry, the key is to keep the customer happy. Cases are one of the ways where you can track customer requests / issues. For a company to keep to ensure better service, it would be ideal that there are zero escalations, but that cannot be predicted.

However with the Einstein Prediction Builder, we can predict the likelihood for the case to be escalated to take timely action

Steps to Enable Prediction Builder

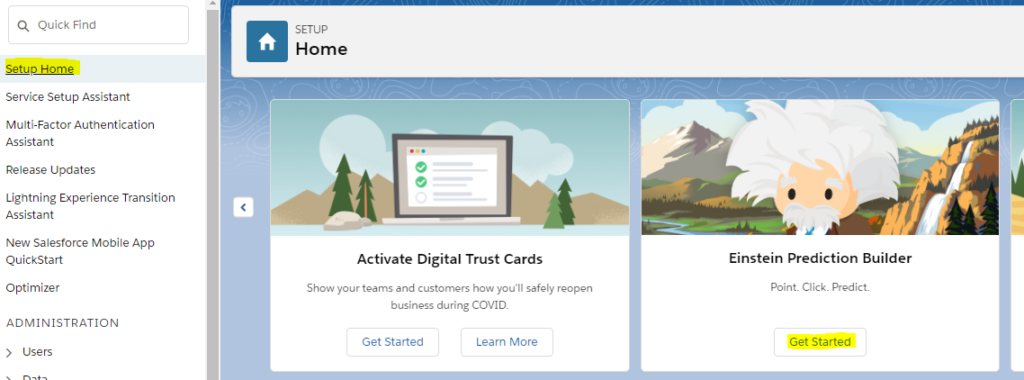
1. In Setup Home, Click on the “Get Started” in the Einstein Prediction Builder.
Einstein Prediction Builder Setup Home

2. Click on “Get Started” in the new window that opens.

3. You will get a message on the page to Wait for some time.

4. Soon the screen would refresh and we would be ready to start building our first prediction.

In the next blog, I will walk through on the various screens and build one prediction.

Getting Started with Einstein Prediction Builder (Part 1)

You have lots of data in your Salesforce Org. This helps you with day to day work. Would you like your system to also help you plan work + prepare you for the future?

Getting some insights or information about what possibly lies ahead can ensure that your work is not hampered or you are well prepared on what to do.

So what to do? Go to a well-known Astrologer who looks at your planet position as of today, use their past experience, see the impact of planets (through past patterns), and comes with an outcome on what lies ahead. That surely can be a solution for an individual, but what about the organization or when all you have is data in the system.

Meet Einstein Prediction Builder – we have an Astrologer / Data Scientist in the house. Einstein Prediction Builder is also doing something similar.

  • Looks at your Planet position – The current data
  • Uses Past Experience – The data we have in the org
  • See the impact – The fields we considered and how fields data impact the outcome
  • Outcome on what lies ahead – The field we are predicting / saving the outcome

When we start building the prediction, here are a few things we need to consider.

Einstein Prediction Builders works best when the question is a “Yes” or “No” or it needs to predict a numeric value. So “Will a customer’s pizza delivery order get delivered late?” is a good scenario to predict

It is important to Segment your data. Let’s say we want to predict whether my pizza delivery (at customer’s home) will happen on time. I would certainly like to remove the orders that are Take Away / Dine In, so that Einstein can build its learning model on orders that were meant for Delivery.

Get the right fields to ensure that Einstein has enough (and relevant) data to learn and then use for prediction. So for pizza delivery, if I choose Mode of transport, Delivery Address, etc. then they provide more relevance to data as they can impact the outcome. Choosing the name of the customer might not help.

Avoid Data Leakage / Hindsight Bias . These are the fields that have data that is due to the outcome of the event being predicted. Adding that customer got a coupon (which is given on late deliveries) would make this field a strong predictor, however, the truth is this field is only set once the delivery is delayed. So a good idea is to remove this field.

Once you configure the fields and complete the prediction builder wizard, Einstein takes some time in building the prediction model. One the status changes to “Ready for Review” you can check the model quality by clicking on “View Scorecard

If the scorecard is in the green zone and we have multiple predictors, we are all set to use the Prediction field for getting insights and being prepared for handling things better.

To try out Prediction Builder, you need to sign up for an org with Prediction Builder enabled. The link to sign up for a free developer org is :-

https://developer.salesforce.com/promotions/orgs/einsteinbuilder

I will follow up with another blog where I will walk through on the various screens on how to enable Einstein Prediction Builder.

Create a Dataset (Salesforce Object) using Dataset Builder and Dataflow

In my previous blog, I talked about creating a dataset from a csv file (Click Here). Now we would be talking about another approach on creating a dataset using dataset builder and dataflow.

A big question – what is a dataflow ?

A Dataflow in simple terms is just a way in which you can start with a particular set of data and then change it, build on it, combine with other data, derive new columns based on some values in other columns, etc. to come up with your final data. So simply it a set of steps or instructions to be performed on a data to use it for further analytics and insights.

Here we would be creating a dataset for Accounts and its owner information (Full Name and Photo)

STEP 1 : Click on Create Button & Select Dataset

There are multiple ways to start creating a dataset. After entering Analytics Studio, you can either click on the “Create” button (on the top right corner) or you can go into your Einstein Analytics app and click the button, etc. Select Dataset.

Create a dataset

STEP 2 : Choose Data Source

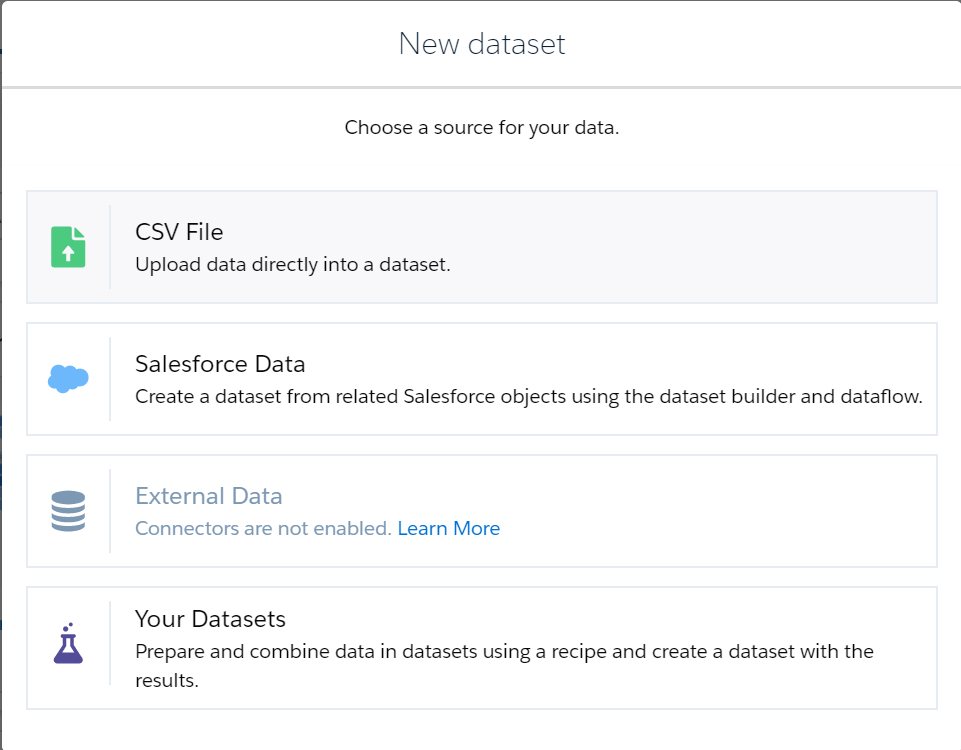
Choose Salesforce Data as the datasource.

Data Source

STEP 3 : Add New Dataset Details

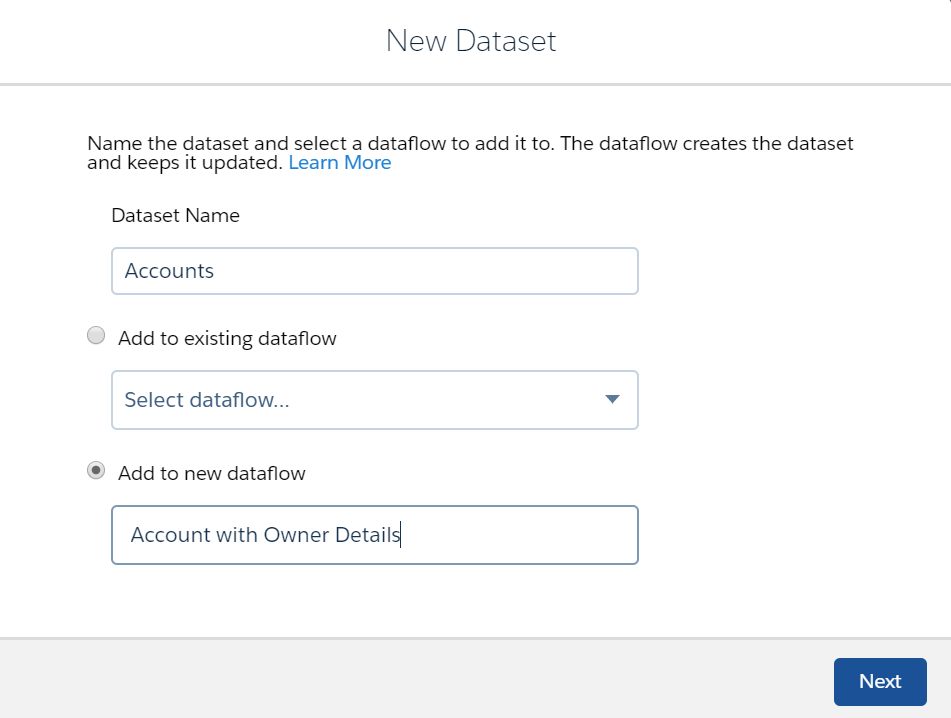
Add the new dataset name and whether you want to create a new dataflow or add it to an existing dataflow. Lets name the dataset as Accounts and choose a new dataflow – Account with Owner Details.

New Dataset

STEP 4 : Select the objects and Fields

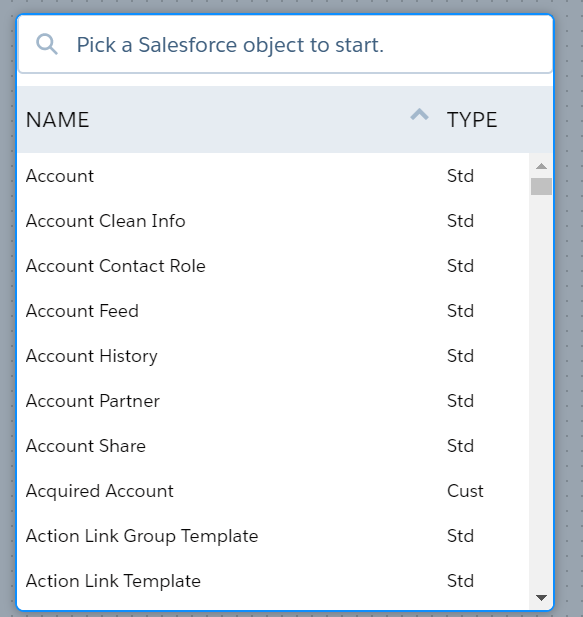
Select the root or base object to start building the dataflow. This is the object from which we will start building our dataflow. Ideally you should choose the base or the main object from which you want to create further associations.

Choose Base Object

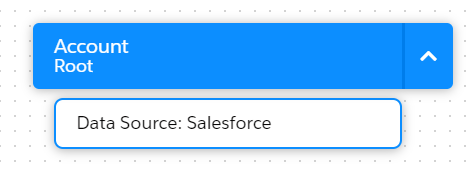
We will choose Account as the Base object.

Base Object

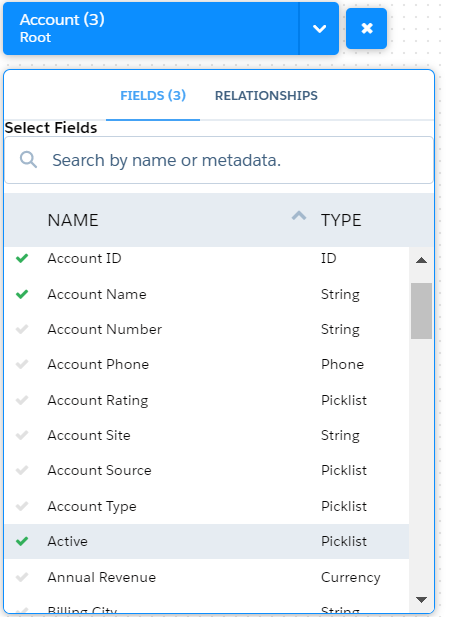
Click on the plus symbol which will allow you to add fields for the Account object that you want to be included in your dataset.

Account Fields

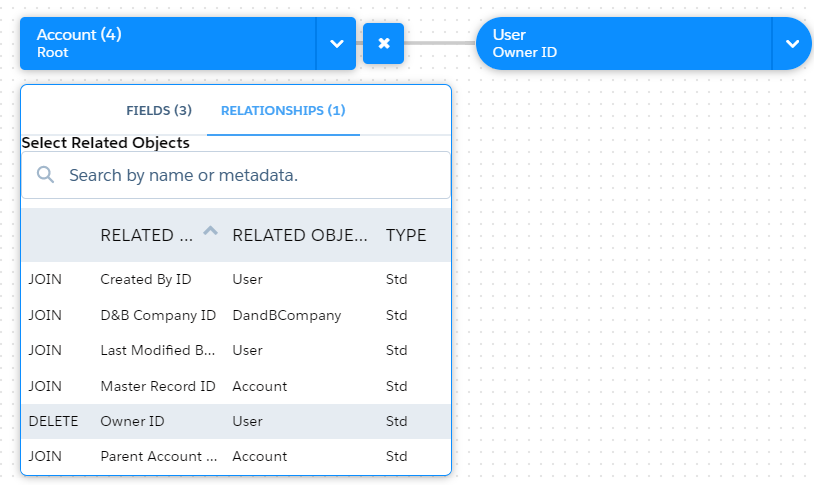
We wanted Account with Owner Details. Click on the Relationship Tab to Associate with Owner fields.

Relationship Tab

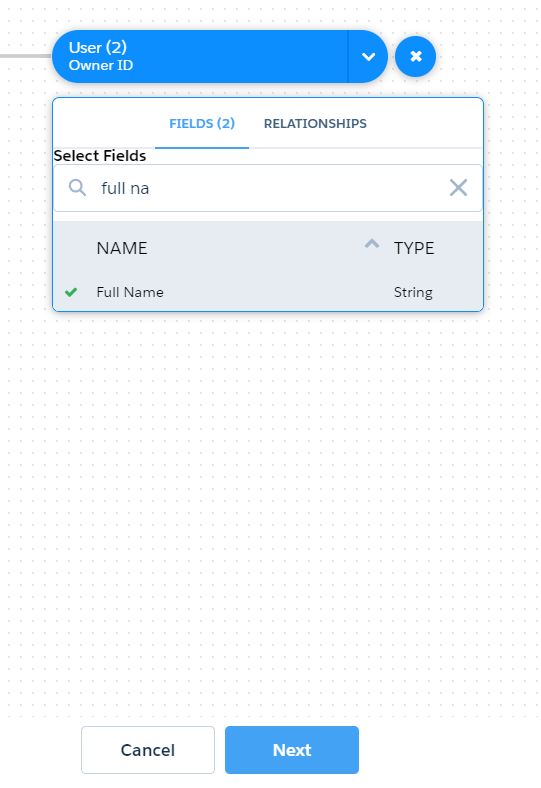
Click on the User (Owner ID) node (plus symbol) and select the fields. In case the list is long, you can even search for the field. We will search for Full Name field. When finished, click on the Next Button.

Choose Fields

STEP 5 : Select the App

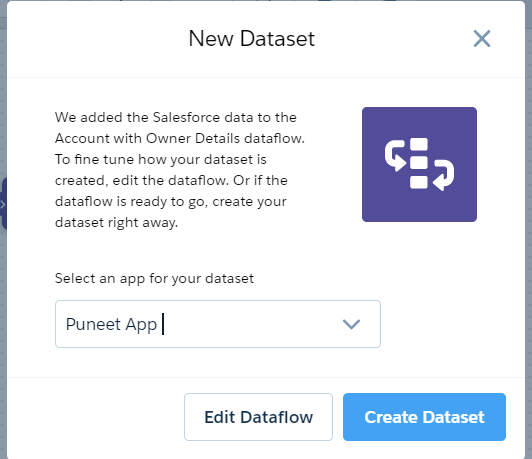
Select the App where you want to save your dataset.

Select App

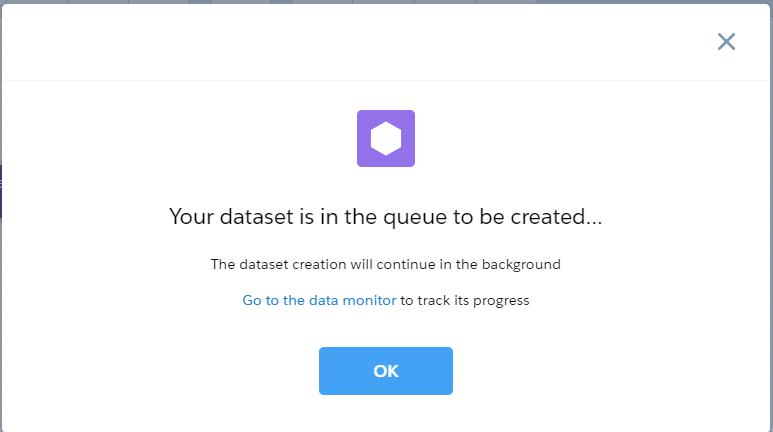
Einstein now does the magic of creating the dataflow and also running the dataflow in the background.

Dataset Creation

You can now see the dataflow that has been created. In case you choose not to perform the above steps, you can directly create the dataflow as well. I will cover the dataflow in the upcoming blogs.

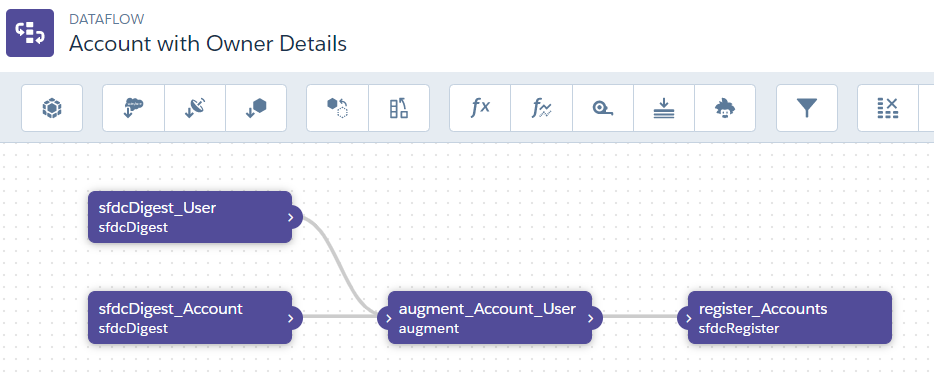
However to give an idea, the dataflow created the following :-

  • 2 SFDCDigest Node – These nodes represent that data is coming from Salesforce Objects
  • 1 Augment Node – This node is to join the Account and the user object i.e. based on the User Id in the Owner field, join the Account data with other user information.
  • 1 SFDCRegister – This is the node for creating the dataset.
Dataflow

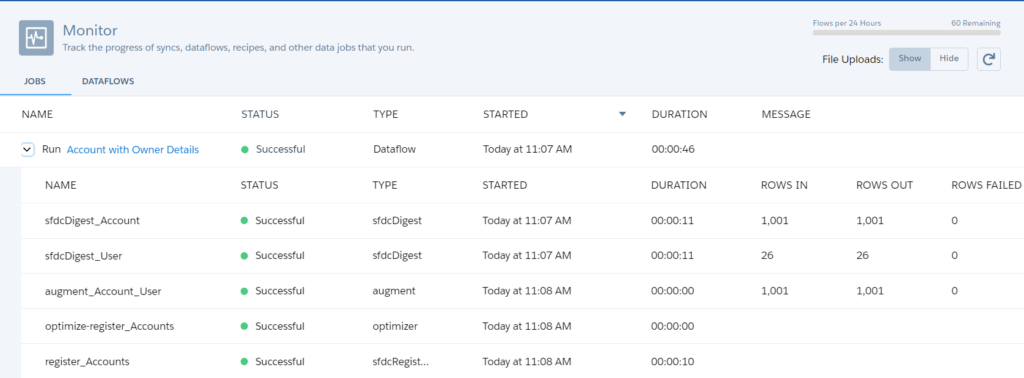
You can check the “Monitor” tab and see your dataflow running with stats of every step.

Dataflow Monitor

You can edit the dataflow directly, if required. I will cover that in the upcoming blogs.

Create a Dataset with CSV file

Lets start creating the first dataset (you can read more about dataset in my blog on Datasets – Click Here) using a CSV file.

STEP 1 : Click on Create Button & Select Dataset

There are multiple ways to start creating a dataset. After entering Analytics Studio, you can either click on the “Create” button (on the top right corner) or you can go into your Einstein Analytics app and click the button, etc. Select Dataset.

Create a dataset

STEP 2 : Choose Data Source

Choose CSV File as we are creating dataset from csv.

Data Source

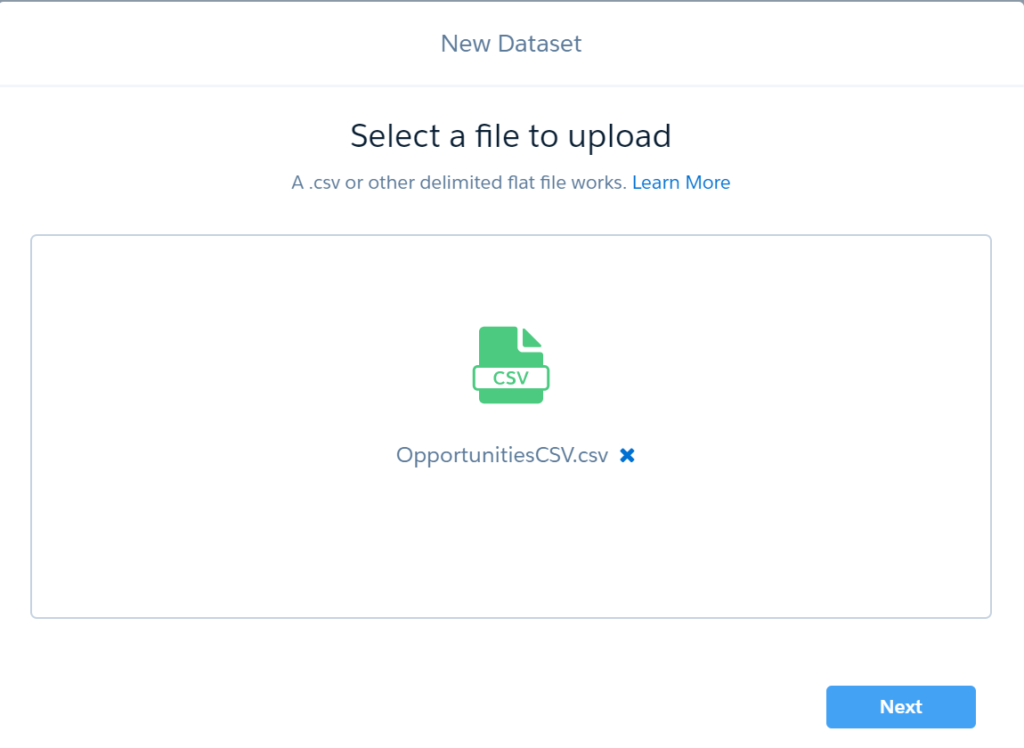
STEP 3 : Upload the CSV File

Upload / Drag and Drop the csv file to upload. Here we are uploading Opportunity Data. I am using the data available in my org (built as part of one of the trailhead modules)

File to Upload

STEP 4 : Define the properties of the Dataset

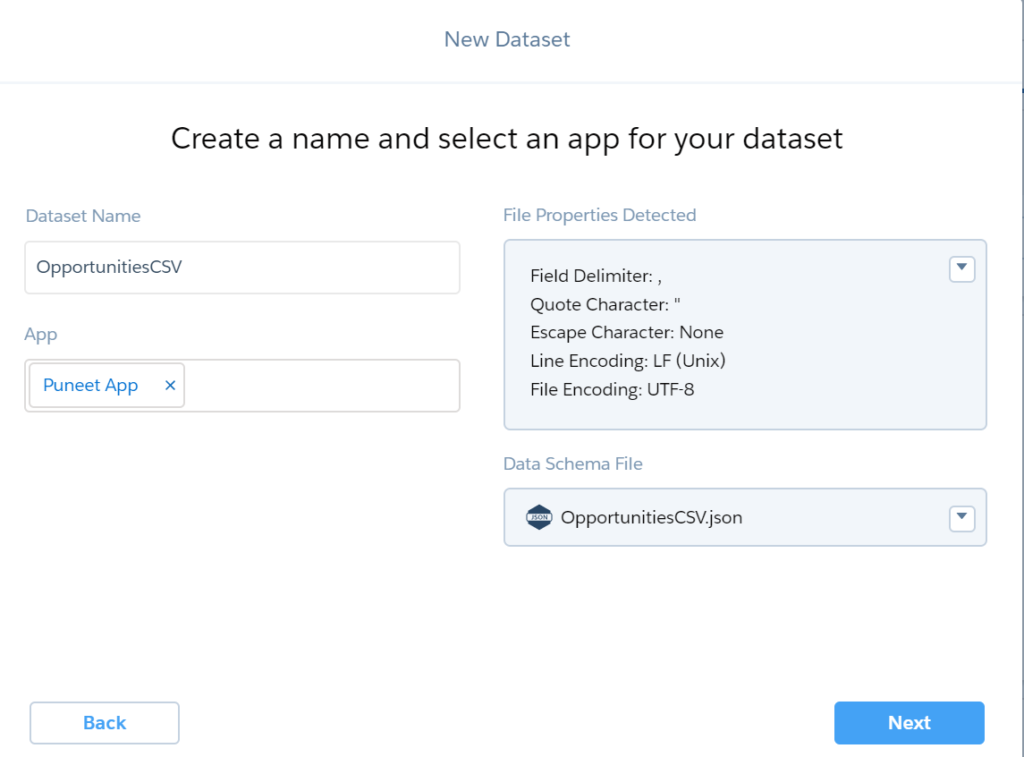
This is the place to give the name and the App where you want to save the dataset. You can also check the file properties (Auto detected) in case it needs a change. Data Schema file will be covered in later blogs, however the file (also known as Extended Metadata or XMD file) is used for some formatting options of the dataset fields and their values. Click Next button to move to the next step.

New Dataset

STEP 5 : Preview and Edit the Field Attributes

This step now allows you to preview the data being loaded and to change any settings. This is the step where you define the type of column (Dimension, Measure and Date) and set its attribute. By default Einstein Analytics automatically detects the data type but you can change it as well.

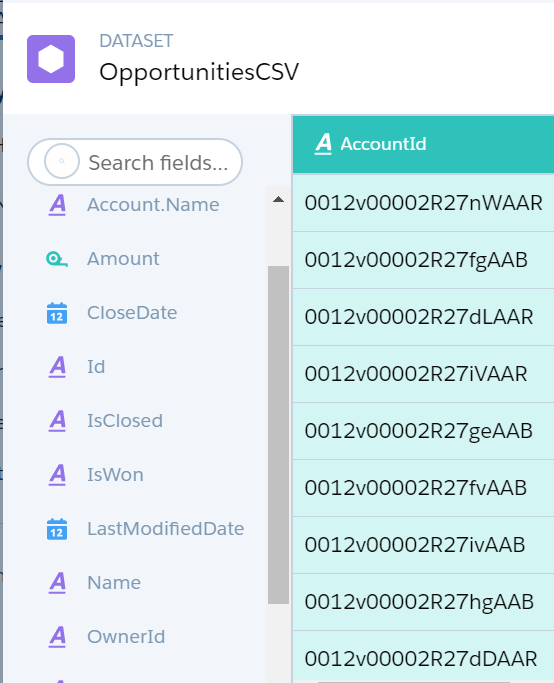
In this step, you can check the fields that would be part of the dataset. As we can see we have Account.Name, Amount, CloseDate, Id, etc. as the columns (or fields) of the dataset.

Dataset Search Fields

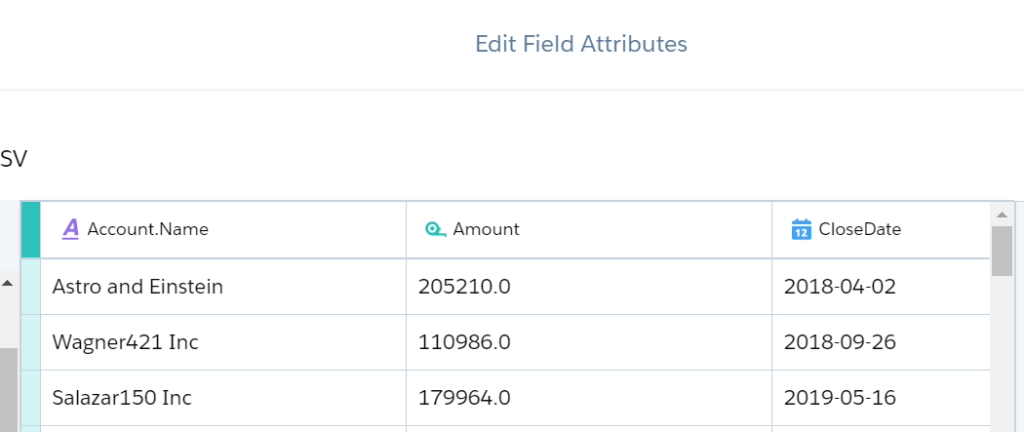
You can preview the data getting loaded. Here I have a screen of 3 columns, where we will now make some changes.

Edit Field Attributes

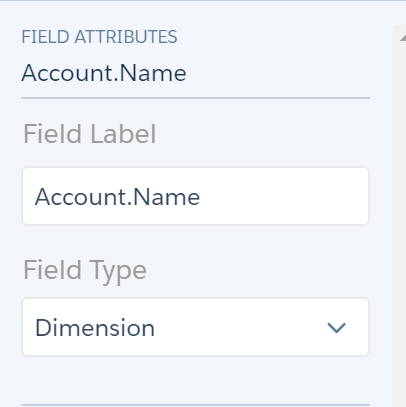
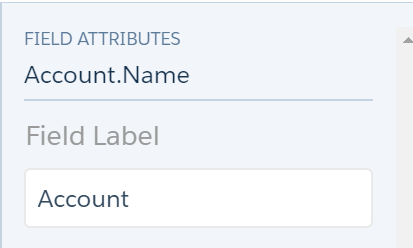
We have a column as Account.Name. This is because in Opportunity Data, we also extracted Parent Account’s Name field and in the csv it got extracted as Account.Name. Further to note Analytics Studio automatically picked the field as dimension (qualitative value).

Dimension Attributes

You can choose to fix column name in CSV file before loading or you can change the field label in this Step. So now we will change Account.Name to Account.

Changing Field Label

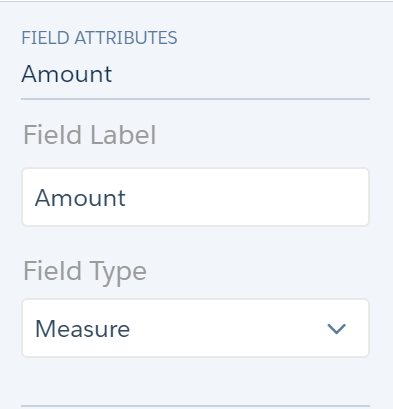
The Next field to check is the Amount field. This field is auto-detected as a Measure (value) field as the data in this column is numeric.

Measure Field
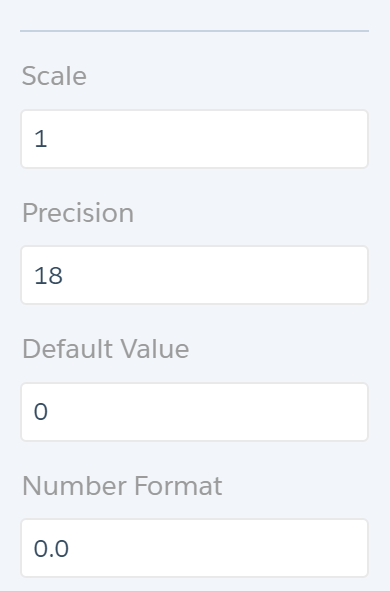
Measure Attributes

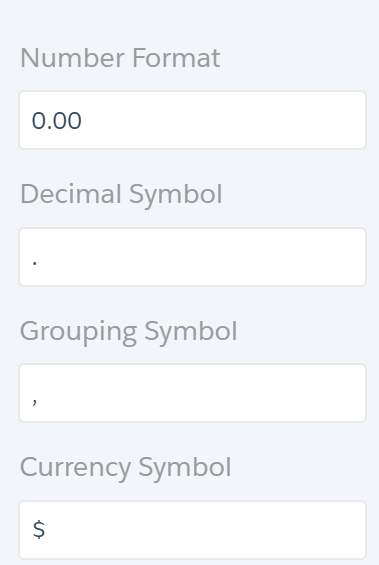
Since its a currency, we will change the number format to 0.00. Furthermore we will add a grouping symbol and a Decimal Symbol to our data.

Changing Measure Attributes

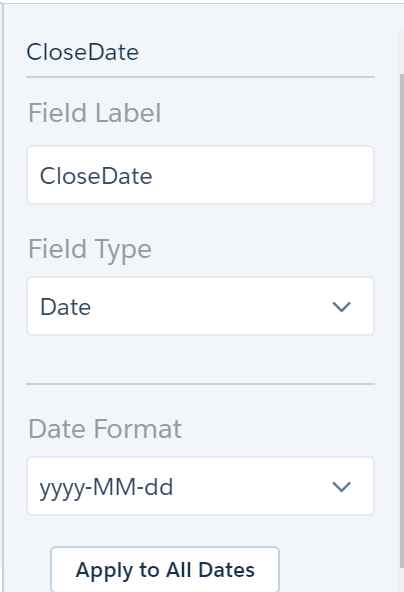
We will now check the Close Date field. This field is of type Date which has been auto-picked by Einstein Analytics.

Date Attributes

After doing checks / changes to the attributes of the fields, we move to the next step.

STEP 6 : Einstein builds Dataset

This is where Einstein Analytics Engine builds the dataset. It can take a few seconds for the while to load. Though I like the page as we can see Mr. Einstein doing the magic.

Creating Dataset

STEP 7 : Review the prepared Dataset

Once the dataset is loaded, you will automatically get transferred to the dataset page. There you can check your dataset properties and also add Security predicates and XMD file. A good check here is to check the number of rows loaded.

Dataset

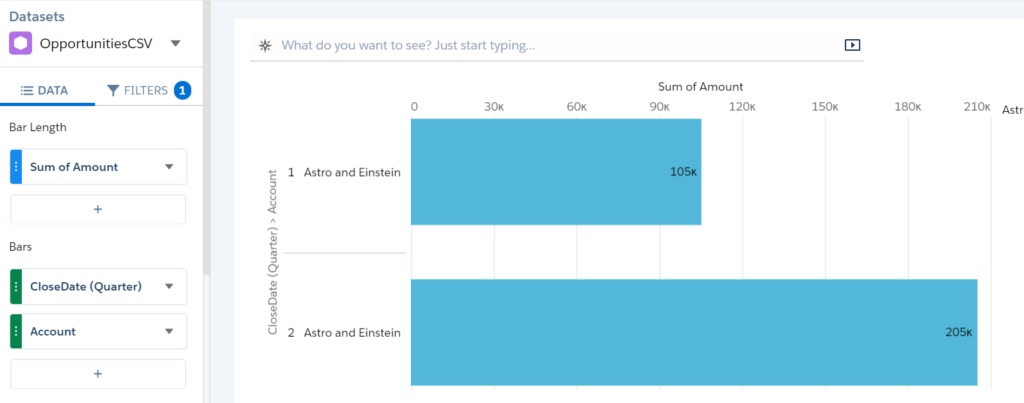
You can even the view the dataset data by clicking “Explore” button. This opens a Lens where you can add your filters, bars (or the dimension) , bar length (measure or calculation on measure)metc. and choose a chart to display.

I added a filter saying Account contains “Einstein”. Bar Length has been kept as Sum of Amount. Bars have been kept as Closed Date (Quarter) and Account (and not Account.Name). Just to add, we only loaded Closed Date, however Einstein Analytics provided us with various groupings like Year, Quarter, Month, Year-Month, Year-Month-Day, etc.

Lens View

We will soon use this dataset in our dashboard.

Salesforce Einstein : Is it for me?

Salesforce Einstein – In Salesforce world, this has a created a buzz. Salesforce Einstein is a big thing. It combines the power of Analytics and AI.
The big question that comes to your mind, should I really know and learn about Einstein?

Person 1 : I am an expert in Apex / Aura / LWC. Do I really need to know about Einstein Analytics or Discovery?
Person 2: I am an expert Admin. I can do amazing things with Flows, Process Builders, Layouts, etc. I can’t write code. Do I really need to know about Salesforce Einstein?
Person 3 : I am a consultant. I know Sales Cloud, Service Cloud, Community, FSL. Should I know about Einstein?

As per me, for the above scenarios, the answer is “Yes” .. Really !!

Before I talk about Salesforce Einstein features, its really important to understand why I should invest my time in knowing about a certain technology and how it impacts my day to day work.

Salesforce is one platform that is continuously growing and innovating at a rapid pace. In my career, I started with Admin work, Learnt Apex, then Aura and LWC. Along with that I am also enhancing my knowledge in Einstein .

Let’s say we have a brand new org and we need to make it functional for user(s).
First we try to do everything out of the box and basic for users to be functional as soon as possible.
Once they start using the system, we build fancy UI (Developer’s delight) and automation.
Then we bring other systems together on one platform.
Then what : We continue to innovate and enhance.

However at the same time we are also building a very crucial thing – Data.

Data plays an important role in our day to day role by providing analysis of what we have done so far, what we are currently doing and what better we can do in future.

Now with large amount of data we have (Salesforce or other systems), how do we Analyze it / how can we use the past experience to build a better future?
The answer is Salesforce Einstein.

Do we really need a tool to analyze / predict – Why can’t my Dev team just run some queries and put some logic into it?
May be 100 records, they can do it minutes. 1,000 records may be hours. 10,000 records – Days? Can you really wait for days?
Now think about what if there are 50,000 records?

What if you no longer need to wait for IT to provide all this and can access powerful data insights on your desktop browser or mobile.

Welcome to the world of Salesforce Einstein. A place where you can easily build Dashboards to visualize data and share insights (Einstein Analytics). A place where you can use the power of machine learning, AI and statistical Analysis (Einstein Discovery).
So is Salesforce Einstein replacement for a Dev / Admin / Consultant ? Consider Einstein as your Friend, Adviser , Additional Team member who will provide you powerful insights to help in day to day work.